
For those with gluten sensitivities or celiac disease, gluten-free desserts are a delightful way to indulge sweet cravings without risk. They offer a variety of flavors and textures, from rich chocolate treats to fruity delights. The versatility of gluten-free desserts makes them perfect for any occasion—be it a breakfast treat, a lunch sweet, or a dinner finale. Health-conscious and delicious, these recipes are a great choice for everyone to enjoy, allowing you to satisfy your sweet tooth comfortably.
Why Choose These Gluten-Free Desserts Recipes
Choosing gluten-free desserts can bring multiple benefits:
- Health Benefits: Many gluten-free desserts use nutrient-dense ingredients like almond flour, offering healthy fats and proteins.
- Delicious Flavor: Ingredients such as fruits, nuts, and natural sweeteners create delectable flavors that may even surpass traditional recipes.
- Ease of Preparation: These desserts often require minimal ingredients and straightforward techniques, making them accessible even for novice bakers.
- Catering to Dietary Needs: Gluten-free baking opens up a world of options for those with dietary restrictions, allowing everyone to partake in dessert enjoyment.
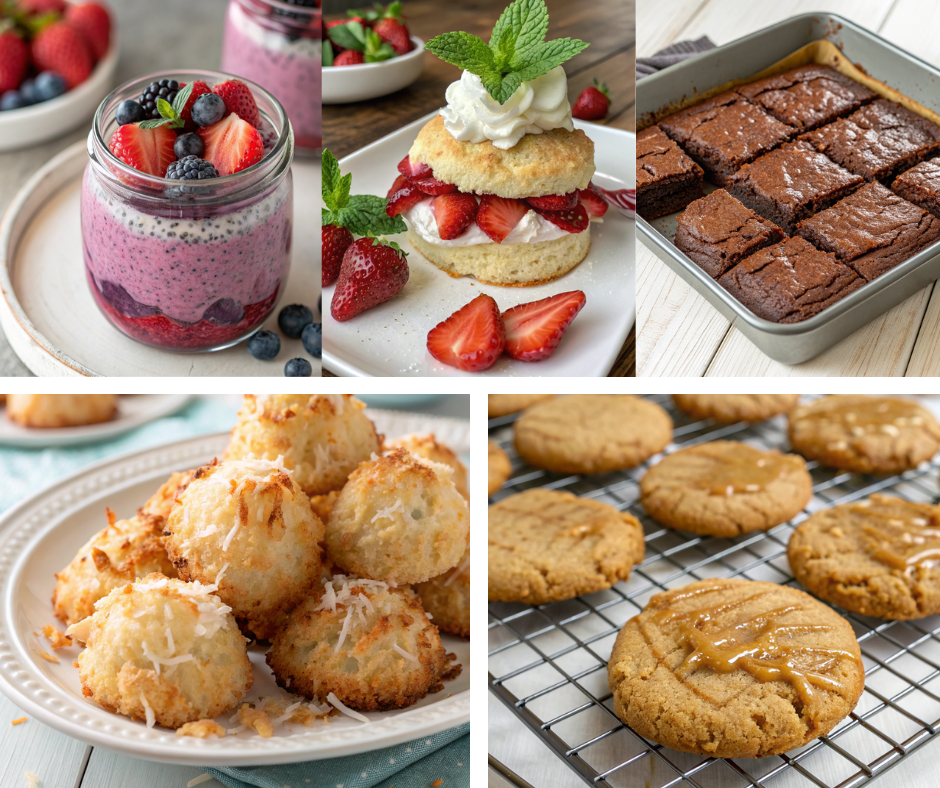
5 Best Easy Gluten-Free Desserts
1. Gluten-Free Chocolate Brownies : Gluten-Free Desserts


These rich and fudgy chocolate brownies are made with almond flour and cocoa powder, offering a decadent treat that is naturally gluten-free. Their chewy texture and deep chocolate flavor will satisfy any sweet tooth, making them perfect for dessert or a midday snack.
Ingredients for :
- 1 cup almond flour
- 1/2 cup cocoa powder
- 1/2 cup coconut sugar
- 3 eggs
- 1/2 cup melted coconut oil
- 1 tsp vanilla extract
- Pinch of salt
Instructions:
- Preheat the Oven: Set your oven to 350°F (175°C). Prepare a square baking pan (8×8 inches) by greasing it or lining it with parchment paper, leaving some overhang for easy removal.
- Combine Dry Ingredients: In a medium mixing bowl, whisk together the almond flour, cocoa powder, coconut sugar, and a pinch of salt until well combined.
- Mix Wet Ingredients: In another bowl, whisk the eggs until frothy. Add the melted coconut oil and vanilla extract, mixing until smooth.
- Combine Mixtures: Pour the wet mixture into the dry ingredients. Stir gently until just combined. Be careful not to overmix to maintain a light texture.
- Pour Batter: Transfer the brownie batter into the prepared pan, spreading it evenly with a spatula.
- Bake: Place the pan in the preheated oven and bake for 20-25 minutes. The brownies are done when a toothpick inserted in the center comes out with a few moist crumbs.
- Cool: Allow the brownies to cool in the pan for about 10 minutes. Then, lift them out using the parchment overhang and transfer to a wire rack to cool completely before cutting into squares.
Tips for Perfect Results:
- Use Fresh Ingredients: Ensure your cocoa powder and almond flour are fresh for the best flavor and texture.
- Don’t Overmix: Mix the batter until just combined to keep the brownies from becoming tough.
- Check for Doneness: Start checking for doneness around 20 minutes. Ovens can vary, so use a toothpick to test; it should come out with a few moist crumbs, not wet batter.
- Let Them Cool: Allow the brownies to cool completely before cutting to maintain their structure.
Serving Ideas:
- Warm with Ice Cream: Serve warm brownies with a scoop of vanilla or mint chocolate chip ice cream for a decadent treat.
- Drizzle with Sauce: Add a drizzle of chocolate sauce or caramel sauce for an extra touch of sweetness.
Pairing Ideas:
- Beverages: Pair with a glass of cold milk, coffee, or espresso for a delightful contrast in flavors.
- Fruit: Serve alongside fresh berries for a refreshing balance to the rich chocolate.
2. Flourless Peanut Butter Cookies : Gluten-Free Desserts

These simple, yet delicious, flourless cookies are loaded with peanut butter goodness and require just a few ingredients. Their soft, chewy texture and rich nutty flavor make them a favorite among cookie lovers, and they’re quick to whip up in a matter of minutes.
Ingredients:
- 1 cup peanut butter
- 1/2 cup coconut sugar
- 1 egg
- 1 tsp vanilla extract
- Pinch of salt
Instructions:
- Preheat the Oven: Start by preheating your oven to 350°F (175°C). Line a baking sheet with parchment paper to prevent sticking.
- Mix Ingredients: In a mixing bowl, combine the peanut butter, coconut sugar, egg, vanilla extract, and a pinch of salt. Use a spoon or electric mixer to mix until well blended and smooth.
- Shape Cookies: Using a tablespoon or a cookie scoop, drop balls of dough onto the prepared baking sheet, spacing them about 2 inches apart. Flatten each ball slightly with a fork, creating a crisscross pattern on top.
- Bake: Place the cookie sheet in the oven and bake for 10-12 minutes, or until the edges are lightly browned.
- Cool: Remove the cookies from the oven and allow them to cool on the baking sheet for a few minutes. Then, transfer them to a wire rack to cool completely.
Tips for Perfect Results:
- Use Creamy Peanut Butter: Choose a creamy peanut butter for best results. Natural or organic varieties work well but ensure they’re mixed thoroughly.
- Avoid Over-Baking: Keep a close eye on the cookies during baking; they can go from perfect to overdone quickly. You want them to be slightly soft when taken out of the oven.
- Cooling Time: Allow cookies to cool on the baking sheet for a few minutes before transferring to a cooling rack. They will firm up as they cool.
Serving Ideas:
- Sandwich Style: Spread a layer of dark chocolate or raspberry jam between two cookies to make a delicious sandwich.
- With a Glass of Milk: Enjoy these cookies with a tall glass of almond or cow’s milk to complement the nutty flavor.
Pairing Ideas:
- Beverages: Try pairing with a hot cup of tea or coffee to enhance the nutty flavors.
- Fruits: Fresh apple slices or bananas work well as complementary snacks.
3. Coconut Macaroons : Gluten-Free Desserts

These chewy coconut macaroons are sweet and satisfying, with a delightful toasted coconut flavor. They’re naturally gluten-free desserts and are perfect for coconut lovers. Enjoy them as a snack, dessert, or even as a gift.
Ingredients:
- 3 cups shredded coconut (unsweetened)
- 1/2 cup coconut sugar or honey
- 2 egg whites
- 1 tsp vanilla extract
- Pinch of salt
Instructions:
- Preheat the Oven: Preheat your oven to 325°F (165°C) and line a baking sheet with parchment paper.
- Prepare the Mixture: In a large bowl, combine the shredded coconut and coconut sugar (or honey). Mix well.
- Add Wet Ingredients: In a separate bowl, beat the egg whites to soft peaks. Gently fold the beaten egg whites, vanilla extract, and a pinch of salt into the coconut mixture until fully combined.
- Scoop Mixture: Using a spoon or a cookie scoop, drop tablespoons of the coconut mixture onto the prepared baking sheet, spacing them apart.
- Bake: Bake in the preheated oven for 15-20 minutes, or until the macaroons are golden brown on top.
- Cool: Once baked, remove the macaroons from the oven and allow them to cool on the baking sheet for a few minutes before transferring them to a wire rack to cool completely.
Serving Ideas:
- Chocolate-Dipped: Dip the base of each macaroon in melted dark chocolate for added richness and elegance.
- On a Dessert Platter: Arrange macaroons on a beautiful dessert platter alongside other sweet treats for a delightful presentation.
Pairing Ideas:
- Beverages: Pair with herbal teas like chamomile or fruity iced tea for a light and refreshing option.
- Fruits: Serve with tropical fruits such as mango or pineapple to match the coconut flavor.
Tips for Perfect Results:
- Use Unsweetened Coconut: For a healthier option, opt for unsweetened shredded coconut. Adjust sweetness according to taste.
- Egg Whites: Make sure to beat the egg whites to soft peaks for the best texture; this will give the macaroons a light and airy quality.
- Mounding the Mixture: When scooping the coconut mixture onto the baking sheet, make sure to create nice, tall mounds for a chewy interior and crispy outer texture.
4. Berry Chia Pudding : Gluten-Free Desserts

This nutritious berry chia pudding is refreshing and satisfying, made with almond milk and chia seeds. It’s not only gluten-free but also vegan, making it a fantastic option for breakfast or dessert. Topped with fresh berries, it’s a colorful and healthy gluten-free desserts.
Ingredients:
- 1 cup almond milk
- 1/4 cup chia seeds
- 2 tbsp maple syrup (optional)
- Fresh berries for topping
Instructions:
- Combine Ingredients: In a bowl or jar, mix together the almond milk, chia seeds, and maple syrup (if using). Stir well to combine.
- Refrigerate: Cover the bowl or jar and place it in the refrigerator for at least 4 hours or overnight. This allows the chia seeds to absorb the liquid and swell.
- Stir Again: After the chia pudding has set, give it a good stir to break up any clumps and achieve a creamy consistency.
- Serve: Spoon the chia pudding into serving bowls or cups. Top with fresh berries and any additional toppings you prefer, such as nuts or granola.
- Enjoy: Serve immediately or keep in the refrigerator for up to a week for a quick breakfast or snack.
Tips for Perfect Results:
- Mix Well: Stir the chia seeds well into the almond milk to avoid clumping. Give it a quick stir after 30 minutes to redistribute the seeds.
- Chill for Longer: For a creamier pudding, allow it to chill for at least 4 hours or overnight. The longer it sits, the better the texture.
- Top it Up: Feel free to add other toppings, such as granola, nuts, or a drizzle of honey for extra sweetness.
Serving Ideas:
- In a Jar: Serve in mason jars for a stylish presentation, perfect for dessert tables or picnics.
- Layered: Alternate layers of chia pudding with yogurt or granola for an attractive parfait.
Pairing Ideas:
- Beverages: Complement with coconut water or a refreshing fruit smoothie for a healthy combination.
- Granola and Nuts: Serve with a side of crunchy granola or mixed nuts for added texture and crunch.
5. Gluten-Free Strawberry Shortcake : Gluten-Free Desserts

This gluten-free desserts feature a delicious almond flour cake base topped with fresh strawberries and whipped coconut cream. It’s light, flavorful, and perfect for any summer gathering or special occasion.
Ingredients:
- 2 cups almond flour
- 1/4 cup coconut sugar
- 1 tsp baking powder
- 1/4 cup coconut oil (melted)
- 2 eggs
- Fresh strawberries and whipped coconut cream for serving
Instructions:
- Preheat the Oven: Start by preheating your oven to 350°F (175°C). Grease a round cake pan or line it with parchment paper.
- Mix Dry Ingredients: In a large mixing bowl, combine the almond flour, coconut sugar, and baking powder. Whisk to ensure that there are no lumps.
- Add Wet Ingredients: In another bowl, mix together the melted coconut oil and eggs until well combined. Pour this mixture into the dry ingredients and stir until you have a smooth batter.
- Pour Batter: Transfer the batter into the prepared cake pan, spreading it evenly with a spatula.
- Bake: Place the pan in the oven and bake for 20-25 minutes or until the top is golden brown and a toothpick inserted in the center comes out clean.
- Cool: Let the cake cool in the pan for about 10 minutes before transferring it to a wire rack to cool completely.
- Prepare Strawberries: While the cake is cooling, wash the strawberries and slice them. You can sprinkle a little sugar on top to macerate them if you prefer them sweeter.
- Assemble the Shortcake: Once the cake is completely cool, cut it into slices. Serve each slice topped with macerated strawberries and a generous dollop of whipped coconut cream.
- Enjoy: Share your strawberry shortcake with friends and family for a delightful gluten-free dessert experience.
Tips for Perfect Results:
- Cool Completely: Be sure to let the cake cool completely before slicing to avoid crumbling.
- Macerate the Strawberries: Allow the strawberries to sit with a bit of sugar for at least 15 minutes before serving. This will draw out their juices and create a flavorful syrup.
- Whip the Cream: When making whipped coconut cream, chill the coconut milk overnight, and use the solid part for best results. Whip it until fluffy before topping the shortcake.
Serving Ideas:
- Layered Presentation: Serve as a layered cake with extra strawberries and whipped coconut cream on top for an elegant look.
- Individual Servings: Create individual shortcakes by placing strawberries and cream between two smaller biscuit layers.
Pairing Ideas:
- Beverages: Pair with a light sparkling wine or rosé for a celebratory touch.
- Tea: Enjoy with a cup of Earl Grey or chamomile tea, enhancing the delightful flavors of the strawberries.
Storing and Reheating Ideas For gluten-free desserts
Proper storage and reheating are crucial to maintaining the quality of your gluten-free desserts:
- Storage Tips: Most gluten-free desserts can be stored in an airtight container at room temperature for 1-3 days or in the refrigerator for up to a week. Items like cakes and brownies can often be frozen, individually wrapped to prevent freezer burn.
- Reheating Methods:
- For Cakes/Brownies: Warm in a microwave for a few seconds or reheat in an oven at a low temperature until slightly warmed through.
- For Pies/Slices: Cover with foil and warm in the oven to keep the crust crisp while heating the filling.
- Avoid Moisture: Ensure containers are completely dry before storing to avoid sogginess, and label items with the date to keep track of freshness.
FAQs about Gluten-Free Desserts
1. What are gluten-free desserts? Gluten-free desserts are sweet treats that are made without any gluten-containing ingredients, such as wheat, barley, or rye. These desserts use alternative flours and ingredients to create delicious options for those with gluten sensitivities or celiac disease.
2. Are gluten-free desserts healthier than regular desserts? Gluten-free desserts can be healthier depending on the ingredients used. Many gluten-free desserts focus on nutrient-dense ingredients such as nuts, fruits, and natural sweeteners rather than refined sugars and flours. However, it’s important to check the overall nutritional profile as some gluten-free desserts can still be high in sugar and fat.
3. Can everyone enjoy gluten-free desserts? Absolutely! While gluten-free desserts are specifically designed for those with gluten sensitivities or celiac disease, they are often delicious and can be enjoyed by anyone, regardless of dietary restrictions. Many people find they love the rich flavors and textures of gluten-free options.
4. How do I know if a dessert is truly gluten-free? To ensure that a dessert is truly gluten-free, check the ingredients list for any gluten-containing components. Additionally, look for certifications or labels that indicate it has been made in a gluten-free facility to avoid cross-contamination.
5. What are some common gluten-free flour options for baking desserts? Common gluten-free flours include almond flour, coconut flour, rice flour, and gluten-free all-purpose flour blends. Each type has unique properties, so it might be necessary to experiment to find the best fit for your dessert.
6. Are gluten-free desserts easy to make at home? Yes, many gluten-free desserts are easy to make at home! With simple recipes and basic ingredients, anyone can whip up delicious gluten-free treats. Many recipes require just a few ingredients and straightforward steps, making them accessible for bakers of all skill levels.
7. What are some popular gluten-free dessert recipes? Some popular gluten-free dessert recipes include chocolate brownies, flourless peanut butter cookies, coconut macaroons, berry chia pudding, and gluten-free strawberry shortcake. These options are delicious and often quick to prepare.
8. Can I substitute regular flour with gluten-free flour in desserts? While you can substitute regular flour with gluten-free flour in many recipes, it’s not always a 1:1 substitution. Different gluten-free flours have different properties, and it may require adjustments in other ingredients or techniques to achieve the desired results.
9. How should I store gluten-free desserts? Most gluten-free desserts should be stored in an airtight container at room temperature for a day or two, or in the refrigerator for longer freshness. Some desserts can be frozen for later consumption, but wrapping them properly is crucial to avoid freezer burn.
10. Where can I find gluten-free dessert recipes? You can find gluten-free dessert recipes in cookbooks, food blogs, and even social media platforms like Instagram and Pinterest. Searching for “gluten-free desserts” will yield countless ideas and inspiration to get you started on your baking journey!
Final Thoughts
Gluten-free desserts not only cater to specific dietary needs but also open the door to creativity and innovation in the kitchen. They can be just as delicious—if not more so—than their traditional counterparts. Whether you’re baking for yourself or for friends and family, these versatile recipes can suit any occasion and satisfy sweet cravings without the guilt. We encourage you to explore the world of gluten-free desserts, experiment with flavors and textures, and most importantly, have fun while creating delightful treats that can be enjoyed by everyone! So go ahead, choose a recipe, get baking, and share your creations with loved ones. Enjoy each bite of your gluten-free indulgence!
Indulge your sweet tooth with our decadent Brown Sugar Caramel Pound Cake Variations
For another refreshing dessert, try our Coconut Matcha Energy Bites Recipes
For more delicious recipes and baking inspiration, come join us on Facebook at RyanRecipes. Follow us to stay updated with our latest creations and share your culinary adventures with our vibrant community!
1 thought on “Indulge in Deliciousness: 5 Easy Gluten-Free Desserts”